Blog

  • How do you wash a washing machine and prolong its lifespan?

    How do you wash a washing machine and prolong its lifespan?

    Knowing how to clean your washing machine will ensure that it produces the best results and lasts longer.

    Understanding how to clean your washing machine is the most effective way to ensure it gives the best results when washing linens, clothes, and other items, ensuring they remain fresh and odor-free.

    In addition to the immediate benefits of freshly-scented laundry cleaning, the washer is also a crucial maintenance task that can extend the machine’s lifespan in the middle of all your laundry room design ideas, saving you the expense and stress of purchasing a brand-new model.

    Cleaning your washing machine isn’t difficult, and our guide contains all the information needed for the job.

    How To Clean A Washing Machine

    When cleaning your washing machine, you probably think of the drum. However, many other areas of the washer require periodic attention. If you don’t care for them, soap scum, mold, and limescale accumulate, making them unpleasant and leading to blocked pipes.

    A thorough cleaning of the washing machine is recommended each month to get rid of any bacteria and mold spores as well as the residue inside and mold growth. It also assists in ensuring that the machine runs at its peak efficiency,” says Michael Rubino, president of All American Restoration and the creator of The Mold Medic: An Expert’s Guide to Mold Removal.

    Utilize these cleaning techniques to ensure the health of your washing machine.

    Run Your Machine On The Hottest Cycle

    Many of us are using the eco or quick-wash settings of our washing machines, leaving out the hot wash option, which does most of the difficult work of cleaning the drums of the washer for us.

    To ensure that the drum is fresh and clean to keep it fresh, you should get to the routine of using the empty machine on a hot wash cycle (140oF/60oC) every couple of weeks without detergent, which could cause foamy build-up. It is possible to make your life easier by washing bedding, for instance, using the hot cycle, if it can handle the temperature.

    The purpose of a warm wash is the killing of germs, which we’ve all become aware of since the outbreak, causing the smells.

    In addition, you could also use the clean cycle of your machine when it is equipped with one that will yield similar results. Most front-loading devices have distinct cleaning cycles, typically neglected,’ explains Wayne Edelman, CEO of high-quality dry-cleaning service Meurice Garment Care, which specializes in wardrobe and interior cleaning services.

    How To Clean A Washing Machine Drum

    If you’re looking to rid yourself of the smells emanating from your washing machine, this is where they’re most likely being generated. If hot water can’t eliminate the odors from your device, attempt again, but this time pour 2 cups (500 milliliters) of washing soda into the drum before starting a clean cycle.

    This won’t just remove germs and eliminate the smell but will also combat the build-up of soap residues and limescale that accumulate within the machine, which is often not visible.

    To ensure that the drum is free of bacteria after every wash, it’s better than leaving the door of your washing machine open to ensure that the drum can dry out, mainly when you use front-loaders. After a few hours, you can close the door and leave it empty until the next wash.

    How To Clean A Washing Machine Seal

    You can turn it over once you’ve cleaned your drum in the washing machine and the seal. That is the malleable part of the rubber located within the door of the washer. It is here that anything you’ve accidentally put into the washing machine, such as hair clips, coins debris, etc., accumulates with fluff, lint laundry detergent, and water. Of course, with time, they can turn stinky and moldy.

    Ideally, it would be best to examine the lower portion of the seal at every wash to eliminate all sharp items that might cause damage to the washing machine. Using a soft, absorbent fabric through the seal and inside is also recommended to ensure that when you take your laundry out of your device, it does not take on the dirt inside the seal.

    After you’ve finished, switch to wash and clean all the interior of the machine’s door, too.

    How To Clean A Washing Machine Detergent Drawer

    It is usually where the laundry detergent residue starts to build over time. As the area is damp, it will allow mold to begin to grow there too.

    The best way to proceed is to remove the detergent drawer and soak it in soapy, hot water. If, after washing the detergent, it isn’t coming free, use a scrubbing brush or an old toothbrush to get rid of the remaining residue before rinsing it.

    If there’s any indication of mold, use Clorox Clean-Up and a brush for cleaning everything,’ advises Wayne Edelman.

    While it’s drying, check the drawer’s interior – it’s likely to have leftover detergent from the laundry and some mold that may be lurking in the drawer, too.

    Like what you’ve done for the drum’s door, Leave the detergent drawer open as you empty the washer and close it when it’s dry.

    Reduce your use of detergent as well – find out how much detergent you’ll need for each wash in your washer’s manual, and often it’s stated on the packaging for washing detergent. This can reduce the residue that builds up inside the drum and the drum.

    How To Clean A Washing Machine Filter

    Have you ever wondered where that spare change has gone? It’s probably gone to the filter that collects debris from your washer and is becoming a slurry of remnants of fluff, lint, forgotten tissues, and gunky remnants.

    The filter is located in your washing machine to guard the pump. This is a job it can do when it is regularly cleaned. But, if it’s not maintained, the filter can be affected by the build-up of germs, which causes unpleasant odors.

    Refer to the user’s manual to learn how to remove and clean the filter. It’s a disaster to cause damage to it. Set a small bowl and towel on the floor under the door to the filter – it’s likely that there is a good amount of water once you open it up.

    While you wait for the filters to dry, clean the cavity thoroughly to remove any residues that may have accumulated inside.

    Take A Look At The Water Inlet Hoses

    It’s worth looking at the hoses frequently connecting to the water intake. It is always recommended to inspect the water inlet hoses to look for evidence of cracks or corrosion, according to Wayne Edelman. Various insurance firms have contacted me to fix and clean up the damage caused by a burst the hose.’


  • How to eliminate fruit flies around the home – ways to get rid of the insects rapidly

    How to eliminate fruit flies around the home – ways to get rid of the insects rapidly

    Are you looking for ways to rid yourself of fruit flies that have invaded your home? These natural solutions will rid your home of the most common insect.

    This is the question that many homeowners have to ask themselves at one point or another, and finding a way to rid the house of fruit flies within your home shouldn’t be a hassle. There are many natural methods to eliminate the pests that invade your home. Many of these methods originate from food staples that could be lurking within the home. But, if you’ve found an insect in your kitchen that is in your kitchen, you should act quickly. Despite their small dimensions, they reproduce quickly over a short time. While they do not take a bite or eat human blood, they have been well-known to transmit pathogens and bacteria on food and other surfaces.

    Before you begin experimenting with these options before you start experimenting with these solutions, verify that you are facing fruit flies since experts advise that this insect has a lot of similarities to other pests that might require treatment differently.

    It’s best to ensure the issue is caused by fruit flies first since drain flies and fungus gnats may be present. Drain flies resemble tiny black moths and are often misinterpreted as fruit flies since they both produce eggs in drains, says Wesley Wheeler, owner of Bug Lord. “They have fluffy dark wings that are rounded and placed flat on the body’s top, and their antennae are feathery and smooth, similar to moth antennae.

    ‘Fungus gnats are around 1/8 inch (3mm) in length; they resemble mosquitoes (just more significant). They have long legs and poor flying abilities, so you’ll observe them stumbling about and scurrying through windows and around house plants.

    Fruit flies, on the other hand, are incredibly swift and brutal to find and typically located in kitchens with the ripening of fruit and garbage. Their distinctive eyes can easily recognize them.’

    If you’re having trouble getting your house guests to leave you, here’s a way to rid your home of fruit flies.

    Mix A Homemade Spray

    One of the most effective ways to fight fruit flies around your home is to make a homemade spray of 14 drops of lemongrass oil diluted into one volume of water. Mix thoroughly, then with a spray bottle, apply on any surface you suspect fruit flies like in the first place,’ suggests Jordan Foster, a pest control expert at Fantastic Pest Control.

    Create A Jar Trap

    The most well-known technique, the Jar trap, is a reliable method to keep your fruit flies out of your home. For this method, you’ll require a jar, plastic wrap, and an exciting item to the fruit flies, such as apple cider vinegar, old wine, overripe or fermenting fruit,’ Jordan says.

    First, place the bait in the jar before wrapping it in plastic wrap. After that, poke a few tiny holes using a toothpick through the wrap and then leave the trap in the area where you observed the fruit activity of the fly.

    The spicy scent will draw the fruit fly and attract them,’ Jordan clarifies. They will infiltrate the jar via the tiny holes but cannot get out.’

    Instead of using plastic wrapping, you could make the same effect using the help of a funnel made from paper. The experts recommend creating a funnel with a small opening at one end that is large enough so that the flies move through. Then, put the horn inside the container (with the broad side facing upwards and the narrow end facing downwards) But be cautious not to get it in contact with the bottom of the liquid inside.

    Leave A Candle Trap

    To develop a unique (but still efficient) approach, Jordan suggests playing with the fruit flies’ desire for light. You’ll need to position the candle securely to stand upright inside the bowl before pouring water into the bowl. Also, ensure that the rest of the room is dark so that the flame is the sole source of light that can attract the fruit flies.

    When they come too close to the flame, the pet’s heat can smudge their wings. If they cannot fly the wings, they’ll fall into the ocean and sink to their deaths in the water,’ Jordan explains.

    Therefore, knowing how to eliminate fruit flies around the home is more than just mastering cleaning tips (though this can be helpful in the prevention of pests).

    How To Stop Attracting Fruit Flies

    Prevention is always better than cure. So think about the ripe fruit and the vegetables you cook, which draw fruit flies. Keep food items in a cabinet or under the counter, covered or sealed: Kimberly Baker, Ph.D., director of the Clemson Extension Food Systems and Safety team. “Check the produce and fruit regularly to see if they’re being left out, and throw away any fruit or vegetable that is turning brown or displaying indications of mold. Certain fruits and vegetables may be refrigerated to prolong their shelf-life by a few days.’

    Fruit flies can often enter your home in your groceries. Wash your produce before storing, according to the former gardening master Kate Russell of The Daily Garden. The process removes the majority of fruit fly pupae and eggs that might be present. The only exception is berries that should be cleaned before eating.’

    How To Get Rid Of Fruit Flies By Cleaning

    If you are trying to rid your home of fruit flies in their home or property, cleaning must be a different priority. Ensure spills are cleaned immediately and all the cans and bottles are washed before placing them in the recycling bin. I’d suggest an annual deep cleaning and a few quick clean-ups during the week, based on how much time you spend in your kitchen, ” says Megan Wede, Done Right Pest Solutions co-owner.

    Dry out sponges, mops, and washcloths following use. Also, she suggests. Organic material will develop if the cleaning materials aren’t dried out enough. Fruit flies love the organic material and bacteria.’

    Be aware of the garbage disposal too. The garbage disposal should be drained of more water than you would normally do can assist in stopping fruit flies from entering, according to her.

  • Why It’s Important To Professionally Clean Your Tile And Grout

    Why It’s Important To Professionally Clean Your Tile And Grout

    One of the biggest challenges for a homeowner is keeping the house clean. If you want to keep your home as inviting and beautiful as it was the day you moved into it, you will need to do a number of small tasks. Cleaning the tile and grout is an area that many people overlook. It is important to keep your tile and grout in good condition. Grout brothers is a great provider to hire for professional tile and grout cleaning.

    Keep your home looking new.

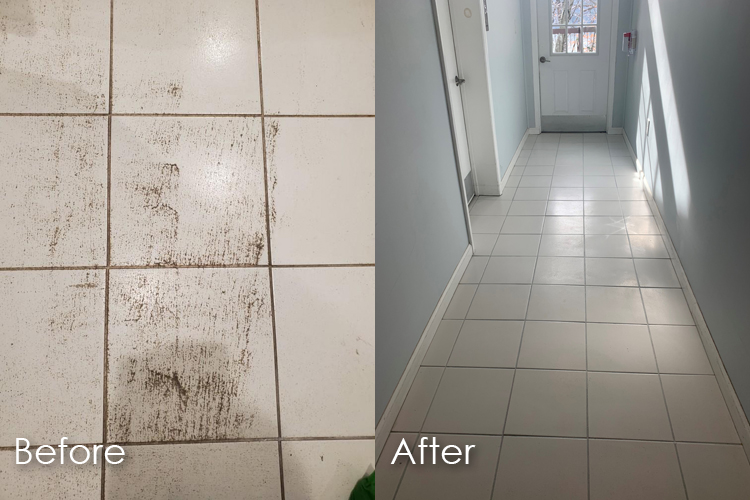
    It is important to keep the tile and grout in a house clean. This will help maintain the fresh look of the home. Most people will wipe the tile and grout with a damp cloth. However, this won’t remove all of dirt and debris. Over time, tile and grout become dull and dirty. You can have your tile and grout professionally cleaned to make it look “as good as new” for visitors and guests by hiring a reliable company like Grout brother.

    Improves the longevity of floor materials.

    Regularly cleaning your tiles and grout can save you money in the long run. Dirt and debris can damage your tile and grout. Your tile and grout can begin to fade, crack and discolor without proper cleaning. In general, they will wear out much faster. By having these areas cleaned professionally on a regular basis, you can avoid costly tile replacements or other repairs.

    Preventing harmful mold and mildew growth.

    If your tiles and grout become dirty, it can lead to a fungal growth like mold or mildew. Mold and mildew spores can cause your home to smell musky and look dirty. They also pose a health risk for the people who live in the building. These spores can be sucked up into the ventilation system, and then blown around the home. Mildew and mold will grow in other areas of your home. These spores can cause respiratory diseases and allergies. Parents with crawling infants or toddlers that play on the floors, or anyone who has respiratory problems, allergies, or asthma should have their tile and grout professionally cleaned.

    Professional cleaning is better for your grout.

    It’s tempting for homeowners to try a DIY cleaning solution, but the grout can be damaged unintentionally. Most of the DIY solutions for tile and grout cleaning in adelaide use more corrosive and abrasive products. These DIY techniques, if not followed correctly, can cause permanent damage to your floor and grout. This will cost you more in the long run when you have to replace or repair them. Grout brothers are trusted experts for cleaning tile and grout. It’s guaranteed that you will get professional results, without risking damage to your floor and grout.

    It’s time to scrub your grout again if you don’t recall the last time it was professionally cleaned. Your home will look more beautiful and your family will be healthier if you keep your grout clean. Grout brothers can help you if you are in southwest Florida, and need your tile and grout to be cleaned. To get a quote, send us an online message to set up an appointment.

  • End of Lease Pest Control

    End of Lease Pest Control

    A flea or pest treatment at the end of your lease may be necessary, depending on whether you have pets and what is stipulated in your rental contract. It is all too common for tenants to discover pests in their rental properties after they move in. This can lead to a dispute, and cause stress for all parties involved.

    To ensure peace of mind, our specialists are licensed and fully insured. They also have a full training. The end-of-lease pest control treatment will only be performed after all cleaning and furniture removal has been completed.

    Common Household Pests

    Our experienced team will inspect your rental property thoroughly to determine if pests are present. Pests can be found in any household.

    • Bedbugs
    • Cockroaches
    • Rodent
    • Fleas
    • Ants
    • Termites

    The harmful effects of unwanted pests

    You’ll lose everything if you allow pests to run wild in your home. This includes your health and the condition of your house. These unwanted pests may cause serious damage at the end of your lease, including:

    • Pests that scavenge for food in unsanitary conditions can spread diseases.
    • You may damage the structure or furniture of your rental property.
    • Renting a property can be a difficult process.
    • Make the environment unpleasant for your next tenant.

    You can guarantee that your property will be free of pests, and that the prospective tenant will appreciate your well-maintained premises.

    Who is responsible for end-of-lease pest control?

    According to the Residential Tenancies Act, the lessor is responsible for ensuring that the Rental Property was clean and suitable to live in at the beginning of the tenancy and to maintain it so that it is still fit to reside in. The landlord is responsible for pest control, including ants, fleas silverfish and spiders.

    The tenant may be responsible for the pest control fees at the end of the lease if they actively encouraged an infestation. Bed bugs could be the result of travelling, rodents from an unclean environment or fleas from the tenant’s pets.

    As a tenant responsible for pest control, you can choose the company you prefer, provided the treatment is performed in accordance with the rental agreement. If you own a dog, or cat, your tenancy contract may require you to get a flea treatment at the end of your lease. We will provide you with a certificate of pest control and a warranty after your end-of-lease treatment.

    After the carpet is cleaned, you must vacate the property. Organizing the pest treatment is in your interest, as otherwise the agent may refuse to sign your bond.

    Ask about our End of Lease Pest Treatment today

    We will do our best to make it as simple as possible. Contact for more information about our affordable, efficient and prompt end of lease carpet flea treatment in Gold Coast. Our team has been working with landlords, agents and tenants for many years to provide comprehensive and complete end-of-lease pest control. 


  • Do You Tip Your House Cleaners

    Do You Tip Your House Cleaners

    What about the house cleaners who you tip? What is the appropriate tip if you choose to do so?

    Let’s look at the history of tipping to better understand when it is appropriate.

    Since the 18th century, tipping for services has become a common practice. Customers tip for many reasons and services. Some people tip to demonstrate their wealth or to fulfill their duty. Others tip out of gratitude or generosity. Tipping is common in some service industries, such as restaurants and hair salons. However, in many other industries tipping comes down to individual preference.

    It is not expected that housekeepers who work for professional house cleaning in North Shore will be tipped, but there are times when it is appropriate. Professional house cleaners, for example, are paid employees of Residential Cleaning Service. They do not expect extra gratuities from customers but appreciate it.

    Do You Know What to Tip A House Cleaner for?

    The typical tip amount for maid services is comparable to the standard tip in restaurants and other service businesses, which is 15 to 20%. A cash bonus or gift is a great way to thank a housecleaning service, whether or not you tip them during the year.

    Are you still unsure of how much to tip your house cleaner? Ask your service provider what is appropriate. You could also ask your friends or neighbors who have used cleaning services. Or, you can just go with what feels right. Always include a thank-you letter with your tip, no matter how much you decide to give.

    It’s okay to tip $10 to $15 per person if your cleaning team uses a collaborative approach. You may want to tip your house cleaners once a week if the same crew cleans it each week. If you have different house cleaners each week, tip every time.

    Do You Tip Cleaning Services Every Time?

    Why not? It’s okay if it’s not within your budget. If you want to express your gratitude to someone who makes your home a more pleasant place to live by improving your quality of life, then you should do so! You’re probably happy with the work they do because you keep using their services. Tipping is a nice way to let them know.

    Do you tip house cleaners for a deep cleaning done once?

    deep cleaning that is done once only is more intensive than a weekly maid service. A thorough deep clean requires heavy lifting, bending and a lot of muscle. Your house cleaners will work hard to keep you happy. They’ll polish floors, shine appliances, scrub bathrooms and remove dirt and dust.

    For a few reasons, you might consider tipping twice as much for a deep clean or season cleaning. It’s only a once-off cleaning so you won’t be doing it very often. It’s a great joy to walk through your house and breathe in the clean, fresh air!

    It’s best to include tipping in your payment. Most offices pool their holiday bonuses and then distribute them evenly. Tipping is not expected or requested. 


  • Ten Quick Cleaning Tips Everyone Should Know

    Ten Quick Cleaning Tips Everyone Should Know

    Justine Harrington On October 16, 2017, 6 CommentsIt can feel as if everything is against you when it comes to cleaning your home. No matter how often you tell your children to pick up their clothing, it doesn’t happen. The clutter of everyday life begins to overwhelm your home. Dishes are piled up in the sink, and stacks of bills and paper cover the kitchen table. This is enough to make anyone go crazy!

    But here’s the thing: You can have a tidy and organized home.

    To keep things neat, it’s all about developing healthy habits. By adopting these daily habits and cleaning tricks, you will not have to spend time cleaning your home on Sunday.

    If you find yourself envious of those people who keep their homes immaculate all the time, then it’s about time to start following these cleaning tips.

    Always Make Your Bed

    It’s a great way to start your day by making your bed. The result is a neater bedroom, and you will feel a burst of energy that will benefit you all day. It only takes 30 seconds to make your bed, and you’ll feel a mental boost.

    If You Get Something Out, Put It Away

    It’s so simple. Please put it back where you took it.

    As most of us know, it doesn’t happen all the time. Getting used to this may take a while, but you will enjoy a cleaner home by following the rule.

    You can think of it like this: If you consistently put away things as they come up, you will not have to spend a lot of time cleaning.

    Do not let the mail pile up

    We’re all guilty! Letting your mail pile up and sorting through it later is more accessible. But you will end up spending more time than needed. Decide on a system for your mail and paperwork right for you and the family, and stick with it. Whatever happens.

    Remove the Trash Before You Leave

    Take out the garbage every morning when you leave your house or car.

    You can prevent garbage buildup by recycling and taking out trash daily before leaving home.

    Spray your shower and toilet with a cleaner at night

    While going through your daily bathroom routine, spend a few extra minutes cleaning your toilet. Also, spray cleaner in your shower. You can also use a wipe on the toilet seat. This will help keep your bathroom clean between deep-cleaning sessions.

    The Best Books About Housekeeping: Cleaning Schedule and Checklist for Adults: Daily Weekly Monthly Plan Ho…$5.99House Cleaning Routine Daily Planner 2022: Daily Week…$6.99 (3)Ads by Amazon

    Rehang Clothes You Have Worn During the Day

    Doing this takes only a few minutes, but many of us still don’t. Refrain from throwing your clothes all over your bedroom. Hang them back up either in the closet or in the hamper.

    The room in your house is most neglected, yet it is also the most important (nothing is more important than sleeping!) Rehanging your clothes at the end of the day can help make your bedroom feel more like a comfortable palace. You can earn bonus points by ensuring you never let your laundry unfold in your bedroom.

    Brush Your pets at least once every other day

    This tip is for anyone who has a dog or cat. This will keep hair out of the corners of your home. You will save a lot of time and reduce the allergens and dander your pets may bring into the house.

    Clean your counters and wipe down surfaces daily

    Nothing makes your home look neater and more organized than a clean countertop. While you are watching Netflix, wipe down the coffee table. Clean the bathroom surfaces as you get ready in the morning. Wipe your stovetop and counters before going to bed.

    It’s incredible how great it feels to start your day with clean surfaces.

    1. Empty / Fill the Dishwasher While Waiting For Your Coffee to Brew

    Every homeowner hates emptying and loading their dishwasher. We delay until the dishes are piled up in the sink.

    You can work on this while brewing coffee or waiting for toast. Why not be productive while you’re waiting?

    So the dishes will not pile up in the sink and remain there all day. You won’t be forced to wash the dishes after work when tired.

    Clean As You Cook

    This simple tip can change your life. Try to clean as you cook when you are cooking dinner.

    Clean any prep work before eating and put it away as the pasta water is boiling. Wash pots and pans immediately after using them. It’s super easy to clean up!

    It would help to change your dish towels every two days to avoid contamination. Don’t even think about that dirty sponge.

    Change your cleaning habits and change your life.

    Most of us lead a busy life. These quick and simple cleaning tips will save you time. You’ll feel more organized if you spend an extra 10 minutes cleaning up each day. This will save you a lot of time on weekends. You’ll be glad you did.

  • Clean your bathroom with these 12 tips!

    Clean your bathroom with these 12 tips!

    It’s a well-known English proverb that kitchen and bathroom maintenance reflects the sophistication and lifestyle of its users. This is a true statement. Your character is primarily determined by how you clean and use your bathroom.

    What are the things you consider when choosing a hotel? You’re looking at whether the rooms are clean. Do you not check first if the bathrooms are clean? Yes, absolutely! Maintaining personal hygiene and enjoying cleanliness by cleaning the bathroom are essential. A thoroughly cleaned bathroom will ensure a relaxing experience for the user. Uncleaned bathrooms look dirty and messy. They can also be a danger to a healthy lifestyle.

    A clean, well-organized bathroom is always a plus, whether in a hotel or home. In a hotel, the cleaning of the toilet is the responsibility of the housekeeping staff. At home, however, you are responsible for the cleanliness. Do you want to keep your bathroom clean and sparkling without any hassle? Continue reading!

    Bathroom cleaning is more than a simple cleaning spree. It is an art. We know that bathroom cleaning is complex, but very few people know how to do it properly.

    A typical bathroom cleaning hack is buying expensive cleaning materials for a clean, fresh, and pristine washroom. You may spend your money on these products without getting the desired results if you need to learn how to use them.

    Here are some crazy but helpful bathroom cleaning tips that will make your job easy and save you money.

    Bathroom Tiles and Flooring Cleaning Black Corners and Edges

    Bathroom tiles and walls are often dirty around the corners and edges due to excess exposure to water and moisture. The dirty corners are not only an eyesore but can also ruin the relaxing feeling of a shower. You can clean the tiles with a variety of expensive solutions and chemicals. You need to choose the right product for your budget and personal needs.

    Buy a cleaner that is easy to use and good for the tiles’ ceramic surface. Avoid cleaners that ruin the smoothness of tiles’ surfaces.

    If your tiles fade, you can also click on the links below to learn more about the causes of fading and what precautions you should take.

    You can create a fantastic tile cleaning solution at home for a low price. Combine 1 part dish soap with two parts water to make soap liquid. Add the same amount of vinegar to the soap liquid. Pour the solution into a spray bottle to clean your bathroom tiles. Spray the solution on your bathroom tiles and scrub with a soft cloth or scrubber.

    Clean Toilet Bowl With Coke

    Bathroom cleaning tips include home remedies and secret cleaning techniques that can get your toilet bowls, sinks, and other bathroom fixtures sparkling clean in under 5 minutes.

    It can be challenging to clean a toilet and sink because the stains are stubborn and emit an unpleasant smell. There is an easy and inexpensive solution to this problem.

    Pour a bottle of Coke into the toilet bowl. Coke is the best bathroom cleaner for rust rings. Pour the entire bottle around the bowl’s rim, coating it completely. Let it sit for an hour before rinsing it with a toilet brush. The alkaline effect from the soda will break down the stains. Use the brush to clean every corner and crevice of the sink or bowl. Enjoy your shiny, bright ceramic surface by flushing it with clean water.

    Bathroom Faucets and Showers: How to Clean Them

    According to Reader’s Digest Canada (Published in 10 Bathroom Cleaning Tricks and Tips), if you live in a region with hard water, you may find that your showerheads become clogged due to mineral deposits. You can use vinegar to remove these deposits. Pour white vinegar into a plastic bag. Soak the showerhead in this bag overnight. Clean the holes in the showerhead with a needle, then wipe the head with a white vinegar-soaked cloth.

    White vinegar can also be used to clean the faucets, taps, and showers by soaking them in a towel for an hour, then wiping them with a soft cloth. This is a simple way to remove limescale deposits from the body. Use baby oil to make it shine.

    How to Clean Chrome and Steel Fixtures

    Stop wasting money on expensive polishes that make chrome and steel shine. Use the DIY solution below to achieve the same results.

    DIY Solution – Rub lemons over chrome and steel for a clean, shiny finish. The lemon extract removes all black carbon and dirt from the fittings, making them look brand new. This DIY tip will clean your fixtures and leave a lemony scent in your bathroom.

    Nahani (Floor Trap) Cleaning

    The floor trap is an essential part of the plumbing system. It acts as a seal for water. The water seal also helps to prevent foul gases from entering the building. Keep the gratings closed to avoid clogs.

    DIY solution- If water drains slowly, flush the drain with hot water quickly to clear clogs. If the DIY solution does not work, you may have to do it manually, especially if there is a lot of soap or particles in the drain.

    No need to change your vinyl shower curtain

    Shower curtains are prone to getting dirty, especially if the color is light. White or cream-colored curtains can turn brown or black. Water stains on the curtains could make them look difficult to clean.

    Curtain Cleaning Tips

    Wash dirty towels with 1/2 cup laundry detergent and 1 cup vinegar in the washing machine. The towels will rub against the curtain as they are washed, cleaning it more effectively.

    Smile with a Happy Smile and Proper Dental Health by using Happy Toothbrushes

    It would be best to have a toothbrush storage area in your bathroom. Your toothbrushes may be contaminated if your bathroom becomes dirty due to the chemicals, water, and algae.

    Use this tip to clean your toothbrushes: Fill a glass with 1/4 hot vinegar. The solution must be changed weekly. You should keep your brush so the bristles are dipped into the vinegar. This will help keep them soft, healthy, and bacteria-free.

  • Office Bathroom Cleaning: Tips and Tricks

    Office Bathroom Cleaning: Tips and Tricks

    You can tell how much an organization cares for its clients and employees in the bathroom. Someone’s opinion of a business can be changed by smelling bad or having a dirty bathroom. Keep it clean and tidy to avoid clients or associates feeling pessimistic about your office’s toilet. You can easily maintain your office bathroom with these tips and tricks:

    A cleaning schedule

    Get a consistent and workable cleaning routine that you can follow and repeat. It is essential to maintain the look and condition of your office bathroom. Clean your bathroom at least once a week. If you need more, depending on how many employees you have. Your facility may be large enough to require a daily or weekly janitor.

    The list of supplies

    List the bathroom cleaning products you’d like to see in your office. A defined list will make completing your task more straightforward, and you’ll always have the necessary supplies. The following is a list with some of the essentials for your supply list.

    Microfiber cloths

    Glass cleaner

    All-purpose spray

    Toilet bowl cleaner

    Replacing harsh bathroom cleaners with safer “green” ones is a good idea. It is an excellent opportunity to improve the health of your employees and your impact on the environment.

    First, clean your toilets

    Let’s get started with a list that includes “hot spots” to keep your bathroom clean.

    It would be best if you cleaned the toilets. Some people suggest putting a can of cola into the toilet bowl, letting it sit there for a while, then flushing it and cleaning it with a toilet bowl brush. Spray the outside of the toilet bowl with disinfectant and let it rest for a couple of minutes before wiping. Toilets are one of the most important things to keep clean and tidy in a bathroom. One of the best examples is in restaurants. 1 out of 3 customers will not return to a restaurant if it has a filthy toilet. This is a 30% revenue loss just from the cleanliness of bathrooms.

    Shiny sink

    Keep the sink free of debris and clean. Keeping your sink as clean and shiny as you want in your home. It can be removed from hard water stains by cutting a lemon and rubbing the cut over the faucets. Use something that contains bleach for sanitizing and removing any toothpaste residue. Choose bathroom cleansers that are not harsh but will leave your bathroom accessories disinfected and smelling fresh.

    Mirror, mirror on a wall

    Now that we have moved past our déjà vu let’s focus on the mirrors. You may remember the mirror smudged with makeup, smeared with water, and fingerprinted at your last restaurant. Did you wonder how often they clean it? You can use glass cleaner or a Microfiber cloth to remove these fingerprints. You can also use plain black tea in a spray container to clean your mirror. Test out all the options to see which one you prefer.

    Bathroom floor cleaning

    Have you ever experienced the sticky, dripping bathroom floor when you stopped at one of these highway rest areas on a road trip? The experience left you shaking your head and thinking, “I will never stop at one of these again.” It’s something other than what you want to happen in your office bathroom. When you clean your bathroom, it’s easy to vacuum and mop the floor. Remove any toilet paper or other debris stuck on the floor. Use to deodorize the area around toilets and urinals.

    Let us know what you think of our bathroom cleaning tips and solutions. Let us know if you have found the best bathroom cleaning solution.

  • How to vacuum better: 5 best vacuum cleaning tips & tricks

    How to vacuum better: 5 best vacuum cleaning tips & tricks

    Our homes should be free of pet hair, dirt, dust, and grime. We need help finding the best way to do this. We should use the best practices and tools to clean our homes quickly and efficiently. Our vacuums are a powerful tool in our arsenal. I will share with you today five vacuuming tips and tricks to help you clean your home like a professional.

    Think Prevention First.

    You can save time by preventing dirt from entering the house. It may seem obvious, but try the tips below to see where you stand. Do you do everything you can to keep dirt where it belongs, outside? Keep things clean in your home:

    Install doormats in all entry points of your home.

    Reduce indoor shedding by brushing your pet and having them groomed.

    Create a system to clean their paws before letting them inside. We use disposable wipes to clean the claws of our small dogs.

    You can enforce a policy of “no shoes inside” for the family or separate indoor and outdoor shoes.

    Only allow your children to eat in the designated area.

    Vacuum small messes immediately before they spread throughout the house.

    By implementing these practices, you can significantly reduce the cleaning you need each week. The Black & Decker Cordless 2 in 1 Vacuum I received is a game-changer for keeping my country home clean! The vacuum is cordless, lightweight, and easy for my entire family. My boys are taught to vacuum any dirt or grass tracked into our mudroom with an always-charged vacuum. You will save time and effort if you clean up a mess immediately.

    Work with Gravity and Clean From The Top Down.

    Always remember that the law of gravitation is on your side when cleaning. Clean a room starting at the top. The floors should be washed last. Dust and dirt from light fixtures, ceiling fans, shelves, blinds, vents, dusty countertops, and dirty shelves will settle on your floors. Avoid vacuuming twice by vacuuming your floors last!

    When I’m not doing deep cleanings, removing all items from shelves, and thoroughly washing all surfaces, I use my crevice tool on my Black & Decker Cordless Two-in-1 Vacuum. The canister is removable from the base, and an extension wand with a 4-foot hose allows for versatility and overhead reach. I can quickly vacuum dust and debris from around objects to clean them between thorough cleanings.

    Be gentle when handling rigs, and select the best vacuum settings.

    I have 100% hardwood floors and tiles with area rugs throughout my house. Rugs have a ragged edge, unlike wall-to-wall carpeting. This can be damaged if vacuumed incorrectly. Vacuum rugs outwards, paying attention to how the vacuum performs on the carpet. Depending on the rug’s pile, you may have to adjust your vacuum’s beater bar. Then, go over the edges gently. Knowing how to use the different settings of your vacuum will help you protect your floor coverings and flooring.

    The SMARTECH(TM) features of the Black & Decker Cordless Two-in-1 Vacuum make cleaning easier. The touchscreen controls allow me to adjust the suction speed, and I can enable AUTOSENSE ™, which automatically adjusts the suction from bare floors to thick carpets. I can easily switch from hardwoods to rugs with this machine.

    Use your vacuum attachments.

    You can use your vacuum to keep more than just the floor clean. You can also use your vacuum attachments for baseboards and upholstery. Also, you can clean window screens, curtains, lampshades, and window screens with your vacuum. The Black & Decker Cordless 2-in-1 Vacuum Low Profile Pet Tool is excellent for me with two Pomeranians, one cat, and a small house. The rubber edge helps to grab pet fur off my upholstered furniture.

    Buy tools suitable for the job,and stick to a cleaning system.

    A regular schedule is one of the best vacuum cleaning tips. Your lifestyle will determine how often you should clean and deep-clean your home. I used to be able to go a week or more without vacuuming when we lived in the city. Since moving to the country, we must clean our homes daily.

    Black & Decker Cordless 2-in-1 Vacuum is a great way to vacuum more often! You’re less likely to use your vacuum if it is lighter or more manageable. You’ll be able to commit to a regular cleaning schedule easier if you invest in cleaning appliances that are best suited for your needs and space.

    The cordless vacuum has a runtime of around 60 minutes, which allows me to clean between rooms in a matter of minutes. I don’t have to worry about plugging or unplugging the cord. I can dust the chandelier and clean the upholstery, curtains, or baseboards with the 3-in-1 accessory tool.

    I use the pet crevice brush with a rubber tip to remove stubborn pet hair and giant dust bunnies. I keep my home neat using the right vacuum cleaner with the correct tools.

    I love sharing what works for me and my household. My five best vacuum cleaning tricks and tips have helped improve your vacuuming skills! Investing in the best vacuuming tools will help you keep your house clean, improve indoor air quality, and prolong the life of your carpets and flooring. Check out the Black & Decker 2-in-1 Cordless Vacuum if you want a lightweight, affordable vacuum that can do a great job on many surfaces. You’ll probably love it as much as me.

  • Cleaning your home in spring is easy

    Cleaning your home in spring is easy

    There’s nothing better than cleaning and organizing your home to prepare for the warm and sunny summer months. With more daylight on the horizon, those dust bunnies you’ve been hiding will be harder to ignore. It’s springtime, which means it’s the perfect time to do a thorough cleaning. Making a spring-cleaning checklist is a massive undertaking unless you are like my mother, who enjoys cleaning. While it may take some planning and preparation, it will be worth it. It’s not just good for you physically but also helps reduce seasonal allergies, improve your mental well-being, and help with your mental health. Isn’t it wonderful to have a sparkling clean home? You can easily clean your home this spring without spending a fortune. We’re also featuring our favorite green cleaning product, Complete. This cleaner can replace almost every product you have in your cupboard.

    Pick Your Spring Cleaning Style

    It’s only sometimes possible for busy families or large houses to spring clean their homes simultaneously. To get everything done, it takes energy. You can do it all at once or plan a few tasks for weekends and evenings when you have some spare time. You can motivate yourself by throwing a spring party or hosting a holiday such as Easter or Memorial Day.

    Make a Spring Cleaning Plan

    Plan your spring cleaning. I prefer to begin with the bedrooms and bathroom upstairs before moving to the living area. The kitchen is usually the last thing I do because it is where people bring dirty items to clean. The size of your house and the level of dirt will determine how long it takes. Make a list of every room in your home and start with one. You can do multiple tasks simultaneously, such as soaking drapes and freshening bed linens. Try grouping cleaning tasks for numerous bathrooms. This will help you stay focused. I prefer to complete major organizing tasks such as closets and drawers last because they take a long time and can interfere with cleaning activities like vacuuming.

    Gather your Spring cleaning Supplies (Hint: You only need one cleaner)

    Practical cleaning tools are essential for a successful spring clean. My house has a limited amount of cleaning products. Cleaning products are expensive and contain toxic chemicals that can harm people, pets, and marine life. Most of them could be more effective. Powerizer Complete is one of the best green products we’ve found. It is a super-concentrated, green cleaning product from the creators of Orange Glo and OxiClean. With just a tiny scoop, Powerizer’s green cleaning ingredients of mineral and plant-based products remove dirt, soap scum, and other residues left behind by other cleaners. Powerizer can replace all of your cleaning products, saving you money.

    The scent is also super fresh and clean, which I find myself smelling all the time. It is gentle enough to be used by people with allergies and skin sensitivities. Add one scoop of Powerizer to warm water. This is the ultimate spring cleaning hack.

    A quick tip: Soak a sponge in Powerizer solution and put it in the microwave for 1 to 2 minutes on high to kill germs.

    Start or Finish the Kitchen

    Keeping the kitchen clean and hygienic is essential because it is at the center of our home. Powerizer, as an all-purpose cleanser, removes grit and grime from surfaces and deodorizes. It can be used in all kitchen areas, including the countertops, backsplashes, inside and outside of the refrigerator, microwave, stovetop, and oven.

    Spring cleaning checklist: What to clean in your kitchen with Powerizer?

    The refrigerator (inside and outside, top and bottom, or behind, if you are brave) – Remove old food and clean stains and drips. Reorganize the fridge if necessary.

    Clean Counters (Safe For Marble & Granite).- Remove smudges and grime. One scoop of Powerizer is dissolved in a gallon of warm, lukewarm water.

    Backsplashes- Wipe to remove splashes from food, gunk, or stains.

    Cabinets — Wipe down the inside and outside cabinets, and toss out expired or old food. Powerizer easily cuts through the gunk.

    Garbage Can This is an area where germs and odors can accumulate. If necessary, scrub with Powerizer and dry the outside upside-down.

    Tile Flooring – Let Powerizer rest on tiles and grout for a whitener and deodorizer.

    Clean The Garbage Disposal. Sprinkle some into the disposal to remove grime and clean.

    Shine the Sink and Faucet- With Powerizer, you will be amazed at how shiny metallic or chrome fixtures, such as your sink faucet, can look. The same is true for the bathroom. When I cleaned my bathroom, I was amazed at its beauty.

    Dishwasher – Powerizer will eliminate the smell of stagnant water, mineral scum, and soap scum from your dishwasher.

    Walls – Wipe off areas of dust or food splashes.

    Glassware – Put dusty vases in the dishwasher, or soak them in the sink to make the crystal and glass shine.

    Clean all your bedding, linens, pillows & towels

    Be sure to replace all bedding and linens as part of your spring cleaning. Spring is the time to go for lighter, brighter colors. If you usually use darker bedding, this could be an excuse to change it. You can use a dryer ball scented with your favorite essential oils to freshen sheets in guest rooms that are not being used. You can hang the sheets outside if you want to be eco-friendly.

    Powerizer is a bleach-free product that brightens the colors of your clothes and bedding and helps remove even the toughest stains. Powerizer is safe to use in any washing machine, including HE machines. It also works with all water temperatures. Add one scoop of Powerizer into the drum for a regular wash. Then, add all your laundry.

    Soak comforters in hot water with a few scoops of Powerizer to remove stains and clean them. Let them soak for 30 minutes at least. Powerizer’s stain-lifting ingredients are active for up 6 hours, in case you want to leave it on longer. You should see the stain and oil floating around the tub once they have been lifted from the fabric. You can rinse everything well or transfer it to your washing machine for a spin/rinse cycle. Remember to wash your pillows. Remember your pillows! Please give them a spin in the washer with Powerizer for cleaning, deodorizing, and freshening. Before re-putting on the pillowcases, let them dry completely.